FISH HOUSE [2024]
3D ENVIRONMENT AND PROPS MODELING
A FISH HOUSE IS A STYLIZED MODEL. SCULPTING IN ZBRUSH AND RETOPOLOGIZE ON MAYA. BAKED ON MARMOSET TOOLBAG, TEXTURING AND REDENRING IN SUBSTANCE PAINTER.
 |  |  |  |  |
|---|---|---|---|---|
 |


Design Process
For the first step of this project, I found a work on ArtStation and wanted to create a stylized prop model for game, so I chose this concept art by Grace Liu.
After that, I have to break down every piece of prop in the sheet to see how many props I need to create and whether there are any props I can reuse multiple times.
Next, I gather texture references for sculpting and texturing. In this project, the materials include wood, metal, rope and fabric, as well as small props.


Blocking
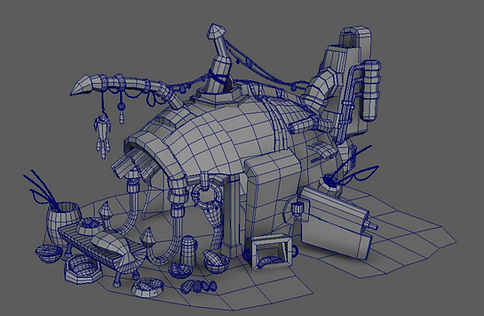
I started blocking in Maya to check the actual scale of each prop. Since this model is intended for a game, I had to strictly limit the polygon count to keep it low-poly. This part took longer than I expected because of the challenges with maintaining both the correct scale and the polygon limit.
Some parts of the model needed beveled edges and extra subdivisions to keep their shape during the ZRemesher process in ZBrush. This helps make sure important forms and sharp edges stay clear when creating the high-poly mesh.


Scuplting
For the sculpting part, I used ZBrush to create the high-poly model. I imported the low-poly model from Maya into ZBrush, then used ZRemesher to add more polygons so I could sculpt more details.
After I finished making the high-poly model, I used Decimate on each part to reduce the polygon count. This way, I could export the model to Maya without losing the details.
Retopology
Next, I imported the decimated model into Maya to start the retopology. I used the blocking model to help save time, fixed parts that didn’t match the high-poly model, and used Quad Draw to retopo some areas.
For the fabric part, I used a single plane and adjusted the edges to match the shape of the high-poly model. I planned to use it as an alpha later.

For the UV map, I decided to use just one map because this model is for a game, and I wanted to challenge myself to organize many objects into a single map.
I have objects with the same faces and shape, so I saved space on the UV map by moving them to the same area. This step also helps with baking, as the AO (ambient occlusion) won’t overlap, and the meshes will share the same result.


Baking
For baking, I used Marmoset Toolbag 5 to bake the textures and create the AO (ambient occlusion). This step is to check if the low-poly and high-poly models are in the exact same place. If there are any errors in the AO, I can fix them in Photoshop.


Texturing
After getting the AO, I moved on to creating the texture in Substance Painter. First, I changed the environment map to 'Studio Tomoco.' This map creates lighting similar to what the game engine uses. I started by texturing the basic materials, then added dirt and details later.


What did I learned from this project?
Through this project, I had the opportunity to learn and experiment with new tools such as ZBrush and Marmoset Toolbag 5. It also marks my first attempt at creating a stylized 3D model. Huge thanks to concept artist Grace Liu for the inspiring design that guided the entire process.
"I'm also really grateful for the feedback I received from my senior—your comments helped me identify and fix several issues I hadn't noticed. Thank you so much for taking the time to critique my work; it truly made a difference in improving the final result.


